

Full Stack Hello World Voting Ethereum Dapp Tutorial — Part 1
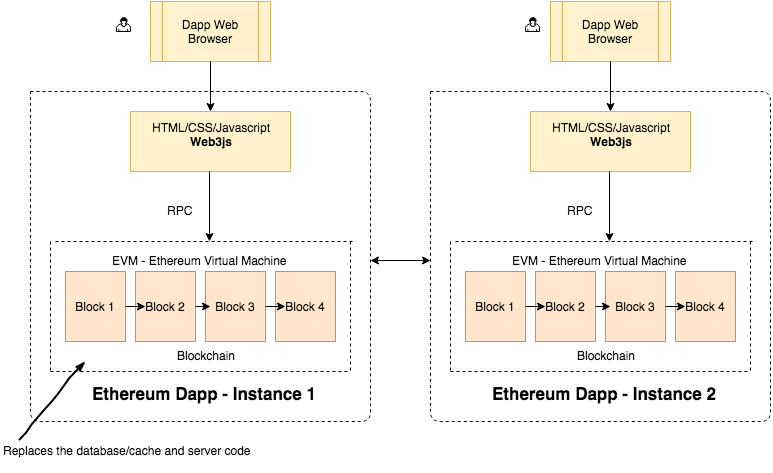
In my previous post, I explained the high level architecture of Ethereum platform comparing it to a web application. As a developer, the best way to learn any new technology is by diving in and building toy applications. In this post, let’s build a simple ‘Hello World!’ application which is a Voting application.
The application is extremely simple, all it does is initialize a set of contestants, let anyone vote for the candidates and display the total votes received by each candidate. The goal is not to just code an application but to learn the process of compiling, deploying and interacting with it.
I have deliberately avoided using any dapp frameworks to build this application because the frameworks abstract away lot of the details and you fail to understand the internals of the system. Also, when you do use a framework, you will have more appreciation for all the heavy lifting the framework does for you!
In lot of ways, this article is a continuation of the previous post. If you are new to the world of Ethereum, I recommend reading it before continuing.
The goal of this exercise is to:
Set up the development environment. Learn the process of writing a contract, compiling it and deploying it in your development environment. Interact with the contract on the blockchain through a nodejs console. Interact with the contract through a simple web page to display the vote counts and vote for candidates through the page. The entire application set up and build was done on a fresh installation of ubuntu 16.04 xenial. I have set up and tested the application on macos as well.
This is how I would visualize this application we are going to build.
- Setting up the development environment Instead of developing the app against the live blockchain, we will use an in- memory blockchain (think of it as a blockchain simulator) called testrpc. In Part 2 of the tutorial, we will interact with the real blockchain. Below are the steps to install testrpc, web3js and start the test blockchain on a linux operating system. The exact same instructions work on macos as well. For windows, you can follow the instructions here (Thanks Prateesh!).
Note: This tutorial currently works with web3js version 0.20.1. Instead of running npm install ethereumjs-testrpc web3 run npm install ethereumjs-testrpc web3@0.20.1 . I will update the tutorial once web3js 1.0 stable is released
Notice that the testrpc creates 10 test accounts to play with automatically. These accounts come preloaded with 100 (fake) ethers.
- Simple voting contract We are going to use the solidity programming language to write our contract. If you are familiar with object oriented programming, learning to write solidity contracts should be a breeze. We will write a contract (think of contract as a class in your favorite OOP language) called Voting with a constructor which initializes an array of candidates. We will write 2 methods, one to return the total votes a candidate has received and another method to increment vote count for a candidate.
Note: The constructor is invoked once and only once when you deploy the contract to the blockchain. Unlike in the web world where every deploy of your code overwrites the old code, deployed code in the blockchain is immutable. i.e, If you update your contract and deploy again, the old contract will still be in the blockchain untouched along with all the data stored in it, the new deployment will create a new instance of the contract.
Below is the voting contract code with inline comment explanation:
Copy the above code to a file named Voting.sol in the hello_world_voting directory. Now let’s compile the code and deploy it to testrpc blockchain.
To compile the solidity code, we will first install npm module called solc
mahesh@projectblockchain:~/hello_world_voting$ npm install solc We will use this library within a node console to compile our contract. Remember from the previous article, web3js is a library which lets you interact with the blockchain through RPC. We will use that library to deploy our application and interact with it.
First, run the ‘node’ command in your terminal to get in to the node console and initialize the solc and web3 objects. All the code snippets below need to be typed in the node console.
mahesh@projectblockchain:~/hello_world_voting$ node
Web3 = require('web3') web3 = new Web3(new Web3.providers.HttpProvider("http://localhost:8545")); To make sure web3 object is initialized and can communicate with the blockchain, let’s query all the accounts in the blockchain. You should see a result like below:
web3.eth.accounts ['0x9c02f5c68e02390a3ab81f63341edc1ba5dbb39e', '0x7d920be073e92a590dc47e4ccea2f28db3f218cc', '0xf8a9c7c65c4d1c0c21b06c06ee5da80bd8f074a9', '0x9d8ee8c3d4f8b1e08803da274bdaff80c2204fc6', '0x26bb5d139aa7bdb1380af0e1e8f98147ef4c406a', '0x622e557aad13c36459fac83240f25ae91882127c', '0xbf8b1630d5640e272f33653e83092ce33d302fd2', '0xe37a3157cb3081ea7a96ba9f9e942c72cf7ad87b', '0x175dae81345f36775db285d368f0b1d49f61b2f8', '0xc26bda5f3370bdd46e7c84bdb909aead4d8f35f3']
To compile the contract, load the code from Voting.sol in to a string variable and compile it.
code = fs.readFileSync('Voting.sol').toString() solc = require('solc') compiledCode = solc.compile(code) When you compile the code successfully and print the ‘contract’ object (just type compiledCode in the node console to see the contents), there are two important fields you will notice which are important to understand:
compiledCode.contracts[‘:Voting’].bytecode: This is the bytecode you get when the source code in Voting.sol is compiled. This is the code which will be deployed to the blockchain. compiledCode.contracts[‘:Voting’].interface: This is an interface or template of the contract (called abi) which tells the contract user what methods are available in the contract. Whenever you have to interact with the contract in the future, you will need this abi definition. You can read more details about ABI here Let’s now deploy the contract. You first create a contract object (VotingContract below) which is used to deploy and initiate contracts in the blockchain.
abiDefinition = JSON.parse(compiledCode.contracts[':Voting'].interface) VotingContract = web3.eth.contract(abiDefinition) byteCode = compiledCode.contracts[':Voting'].bytecode deployedContract = VotingContract.new(['Rama','Nick','Jose'],{data: byteCode, from: web3.eth.accounts[0], gas: 4700000}) deployedContract.address contractInstance = VotingContract.at(deployedContract.address) VotingContract.new above deploys the contract to the blockchain. The first argument is an array of candidates who are competing in the election which is pretty straightforward. Let’s see what are all in the hash in the second argument:
data: This is the compiled bytecode which we deploy to the blockchain. from: The blockchain has to keep track of who deployed the contract. In this case, we are just picking the first account we get back from calling web3.eth.accounts to be the owner of this contract (who will deploy it to the blockchain). Remember that web3.eth.accounts returns an array of 10 test accounts testrpc created when we started the test blockchain. In the live blockchain, you can not just use any account. You have to own that account and unlock it before transacting. You are asked for a passphrase while creating an account and that is what you use to prove your ownership of that account. Testrpc by default unlocks all the 10 accounts for convenience. gas: It costs money to interact with the blockchain. This money goes to miners who do all the work to include your code in the blockchain. You have to specify how much money you are willing to pay to get your code included in the blockchain and you do that by setting the value of ‘gas’. The ether balance in your ‘from’ account will be used to buy gas. The price of gas is set by the network. We have now deployed the contract and have an instance of the contract (variable contractInstance above) which we can use to interact with the contract. There are hundreds of thousands of contracts deployed on the blockchain. So, how do you identify your contract in that blockchain? Answer: deployedContract.address. When you have to interact with your contract, you need this deployed address and abi definition we talked about earlier.
-
Interact with the contract in the nodejs console
contractInstance.totalVotesFor.call('Rama') { [String: '0'] s: 1, e: 0, c: [ 0 ] } contractInstance.voteForCandidate('Rama', {from: web3.eth.accounts[0]}) '0xdedc7ae544c3dde74ab5a0b07422c5a51b5240603d31074f5b75c0ebc786bf53' contractInstance.voteForCandidate('Rama', {from: web3.eth.accounts[0]}) '0x02c054d238038d68b65d55770fabfca592a5cf6590229ab91bbe7cd72da46de9' contractInstance.voteForCandidate('Rama', {from: web3.eth.accounts[0]}) '0x3da069a09577514f2baaa11bc3015a16edf26aad28dffbcd126bde2e71f2b76f' contractInstance.totalVotesFor.call('Rama').toLocaleString() '3' Try the above commands in your node console and you should see the vote count increment. Every time you vote for a candidate, you get back a transaction id: Example: ‘0xdedc7ae544c3dde74ab5a0b07422c5a51b5240603d31074f5b75c0ebc786bf53’ above). This transaction id is the proof that this transaction occurred and you can refer back to this at any time in the future. This transaction is immutable. This immutability is one of the big advantages of blockchains such as Ethereum. In future tutorials, we will build applications leveraging this immutability.
-
Webpage to connect to the blockchain and vote Now that most of the work is done, all we have to do now is create a simple html file with candidate names and invoke the voting commands (which we already tried and tested in the nodejs console) in a js file. Below you can find the html code and the js file. Drop both of them in the hello_world_voting directory and open the index.html in your browser.
If you remember, we said earlier we will need the abi and the address to interact with any contract. You can see above in the index.js file how they are used to interact with the contract.
This is what you should see when you open the index.html file in your browser.
If you are able to enter the candidate name in the text box and vote and see the vote count increment, you have successfully created your first application! Congratulations! To summarize, you set up your dev environment, coded a simple contract, compiled and deployed the contract on the blockchain and interacted with it via nodejs console and then through a webpage. Now would be a good time to pat yourself on the back if you haven’t already :)
In part 2, we will deploy this contract to the public test network so the entire world can see it and vote for a candidate. We will also get more sophisticated and use the truffle framework for development (and not have to use the nodejs console to manage the entire process). Hope this tutorial helped you get a practical idea on how to get started with developing decentralized application on the Ethereum platform.
As always thanks Raine Rupert Revere for corrections/edits of this post.
If you run into issues getting the application working, feel free to DM me on twitter @zastrinlab
If you want a more challenging project, I created a course to build a decentralized eBay on Ethereum & IPFS.
If you would like to get notified when I write more tutorials, you can subscribe here.
Thanks to Raine Rupert Revere. EthereumBlockchainTutorial One clap, two clap, three clap, forty? By clapping more or less, you can signal to us which stories really stand out.
4.7K 137 Follow Go to the profile of Mahesh Murthy Mahesh Murthy Techie, Foodie, Traveler, Founder www.zastrin.com
Related reads Making Sense of “Cryptoeconomics” Go to the profile of Josh Stark Josh Stark
2.1K
Also tagged Ethereum Enigma and Ethlend Partner to bring Secret Contracts to Decentralized Lending Go to the profile of Enigma Project Enigma Project
2K
Also tagged Tutorial A Look Back At 2017 (I): Best Web UI Kits, Design Video Tutorials, and UI/UX Designers Go to the profile of linda linda
739
Responses Write a response… Applause from Mahesh Murthy (author) Go to the profile of Prateesh Prateesh Jun 17, 2017 Steps to install testrpc in windows 10
Install Visual Studio Community Edition. If you choose a custom installation, the bare minimum items that need to be checked are all pertaining to Visual C++ (Current version is VS 2017) Install the Windows SDK for Windows (If you are in Windows 10 install SDK… Read more…
277 6 responses Applause from Mahesh Murthy (author) Go to the profile of Арсений Печенкин Арсений Печенкин Nov 19, 2017 web3.eth.accounts For web3.version ‘1.0.0-beta.26’ this code doesn’t work. You can get accounts by executing this code web3.eth.getAccounts().then(console.log)
64
Applause from Mahesh Murthy (author) Go to the profile of Diego Quintana Valenzuela Diego Quintana Valenzuela Oct 25, 2017 Just wondering if this might help someone: I ran into this problem
web3.eth.accounts Error: Invalid JSON RPC response: undefined at Object.InvalidResponse ... Which is solved having the testrc service up and listening, for example in another terminal. More info in https…
Read more…
30 1 response Applause from Mahesh Murthy (author) Go to the profile of Steve Suranant Steve Suranant May 1, 2017 Cant thank you enough for writing this post, I have been struggling to find an updated document as you are. Your post helped me a lot in understanding how everything comes together.
13
Applause from Mahesh Murthy (author) Go to the profile of Joe Cotroneo Joe Cotroneo Jan 31, 2017 Thanks for this very helpful introduction to contract coding.
After running testrpc I was getting an error trying to connect via node on my ubuntu 16.04 VM (using vagrant/virtualbox).
node
Web3 = require('web3') web3 = new Web3(new > Web3.providers.HttpProvider("http:… Read more…
7 1 response Applause from Mahesh Murthy (author) Go to the profile of John Charles McLaughlin John Charles McLaughlin Nov 6, 2017 Thanks so much for the article. As a learning exercise I converted the tutorial contents to 1.0 web3 bindings and set up a one line build for it.
https://github.com/mjhm/hello_world_dapp
5
Conversation with Mahesh Murthy. Go to the profile of Justin Zhang Justin Zhang Aug 17, 2017 Thanks for the tutorial! I have a few questions:
What is contract.runtimeBytecode? In the code the contractInstance is acquired using abi and address. I wonder why can’t we get the instance using address only and then get the abi from the instance? Finally, is there a tool… Read more…
1 response Go to the profile of Mahesh Murthy Mahesh Murthy Aug 18, 2017 Here is the difference between bytecode and runtime bytecode: https://www.reddit.com/r/ethereum/comments/3pq08g/some_quick_things_about_verifying_contracts/cw8qn0d/ The contract address is like a pointer to your contract on the blockchain. And your contract is in bytecode so you can’t get ABI from it. Although, in the future… Read more…
70 2 responses Applause from Mahesh Murthy (author) Go to the profile of Grant Herman Grant Herman Jun 15, 2017 You have done such an amazing job with this. I have read through so many articles and this was just such a good starting place
3
Applause from Mahesh Murthy (author) Go to the profile of Grace Tan Grace Tan Oct 23, 2017 Hi all. I got Mahesh’s blessing to post my very simple Node app version of this tutorial, which can be found here: https://github.com/gtan66/voting-dapp. Hopefully this repo will help anyone with version issues, and people who are running into obscure issues.
Invalid Opcode error:
Read more…
17
Applause from Mahesh Murthy (author) Go to the profile of Arthur Mastropietro Arthur Mastropietro Nov 16, 2017 Great tutorial, congrats for that, you provided a great service for the community.
For those who are not having votes updated when open in browser and click some votes, don’t forget to update your code with the address where the contract is deployed as pointed at index.js:
Read more…
3
Conversation with Mahesh Murthy. Go to the profile of W. Cameron W. Cameron May 18, 2017 I tried to write your Node REPL contracts commands all in one script and it didn’t work, the deployedContract.address was always undefined. Following your instructions to use the REPL, however, worked perfectly. I’m trying to understand why that might be the case. Could you provide any insight into that?
1 1 response Go to the profile of Mahesh Murthy Mahesh Murthy May 19, 2017 The only thing I can think of is, the deploy (VotingContract.new) is somehow happening asynchronously in your script. You can try creating a callback function and check the address in that function. Details: https://github.com/ethereum/wiki/wiki/JavaScript-API#web3ethcontract I would be curious to hear what you find out.
5 2 responses Applause from Mahesh Murthy (author) Go to the profile of josh pierro josh pierro Oct 21, 2017 Here is a pure js and material design port of this excellent tutorial. I look forward to doing the rest on Zastrin!
https://github.com/joshpierro/ethereum-voting-dapp
4
Applause from Mahesh Murthy (author) Go to the profile of MANAS MAHAPATRA MANAS MAHAPATRA Oct 25, 2017 Thanks for this great small hands-on tutorial. I tried this on AWS and could get it working. Initially struggled with the web page running — then I observed while debugging the JS that browser was caching the older contract address. Thanks again!!
1
Applause from Mahesh Murthy (author) Go to the profile of Alex Mochu Alex Mochu Nov 16, 2017 This has been very helpful. Thank you
1
Applause from Mahesh Murthy (author) Go to the profile of Keith Holliday Keith Holliday Sep 26, 2017 Great post! Thanks for doing the whole example from scratch. It is nice to see how the full stack works without the framework at first.
1
Conversation with Mahesh Murthy. Go to the profile of Piyush Ramavat Piyush Ramavat May 19, 2017 Hey Mahesh,
Thanks for this wonderful post. I had one doubt though. Similar to gas payment for deploying the contract, don’t we have to pay gas for executing the transactions?
I mean when we call: contractInstance.voteForCandidate(), don’t we’ve to specify gas? I know call(…
Read more…
1 1 response Go to the profile of Mahesh Murthy Mahesh Murthy May 20, 2017 You do pay gas for any transactions which change the state. In this tutorial, you are only interacting with testrpc and it has default gas price and limit already set. You are just not explicitly specifying the gas price. Check your account balance, execute a transaction and check again, you will notice the balance would have gone down.
2
Applause from Mahesh Murthy (author) Go to the profile of Grady Laksmono Grady Laksmono Nov 25, 2017 Thanks a lot for the tutorial. This should be part of the Ethereum.org Hello World :)
1
Conversation with Mahesh Murthy. Go to the profile of Craig Skipsey Craig Skipsey Jan 25, 2017 Could we host the HTML and JavaScript files (and anything else needed for the front end) on IPFS? Making it a truly decentralised “hello world”!
3 2 responses Go to the profile of Mahesh Murthy Mahesh Murthy Jan 25, 2017 For sure, that would be awesome! I haven’t tried it yet, let me know if you get it working.
3
Applause from Mahesh Murthy (author) Go to the profile of Partha SK Partha SK Jul 12, 2017 Tried all the steps and it works perfectly fine! Thanks Mahesh for putting this together.
1
Applause from Mahesh Murthy (author) Go to the profile of InverseFunction InverseFunction Jun 28, 2017 Thanks Mahesh.
Nice article. I was struggling to get this done since long time but due to outdated articles, I was always getting stuck.
Finally I got this done.
Thanks a ton again
1
Applause from Mahesh Murthy (author) Go to the profile of Jackson Ng Jackson Ng Sep 1, 2017 Murthy, thank you very much for writing this. This is probably the best tutorial I have come across that covers Ethereum, Smart Contract and Truffle.
I followed your tutorial and made some changes along the way so that I can have it running on Google Cloud and have users execute smart contract through the DApp on their…
Read more…
1
4.7K
Go to the profile of Mahesh Murthy Never miss a story from Mahesh Murthy, when you sign up f